第6期博客(响应链)

iOS响应链中HitTest、nextReponder的介绍

iOS的UIEvent事件有好几种:Touch Events(触摸事件)、Motion Events(运动事件)、Remote Events(远程事件),其中最常用的应该就是Touch Events了,今天我们主要就讲它,核心就是到UIView
func hitTest(_ point: CGPoint, with event: UIEvent?) -> UIView?
以及nextReponder两个

比如成果:魔图&图片浏览 复杂的视图层级拆分

wechatimg166
pb

考一考: 直接继承于UIResponder的类有哪些?

UIResponder ?? 响应链 ??

  • 响应链是什么时候怎样构建的?
  • 事件第一个响应者是怎么确定的?
  • 事件第一个响应者确定后,系统是怎样传递事件的?

响应链的构建

先看看UIResponder类

1
2
3
4
5
6
7
8
9
10
11
12
13
open var next: UIResponder? { get }
open var canBecomeFirstResponder: Bool { get } // default is NO
// default is NO
open func becomeFirstResponder() -> Bool
open var canResignFirstResponder: Bool { get } // default is YES
// default is YES
open func resignFirstResponder() -> Bool
open var isFirstResponder: Bool { get }
open func touchesBegan(_ touches: Set<UITouch>, with event: UIEvent?)
open func touchesMoved(_ touches: Set<UITouch>, with event: UIEvent?)
open func touchesEnded(_ touches: Set<UITouch>, with event: UIEvent?)
open func touchesCancelled(_ touches: Set<UITouch>, with event: UIEvent?)

常见的触摸响应链构建

  1. addSubview
  2. ViewController 初始化

res

事件响应过程

核心的方法

1
2
func hitTest(_ point: CGPoint, with event: UIEvent?) -> UIView?
func point(inside point: CGPoint, with event: UIEvent?) -> Bool

注意:hittest & pointinside是uiview的实例方法

比如tableview的cell点击,hitTest寻找响应cell的过程

  • windows
  • windows.rootController (navController).view
  • navController.rootControler (vc).view
  • tableview
  • some cell
  • contentView

Note: 查询过程也不是这么顺利的,有弯路,也有属性限制

  • hittest打算从后往前遍历subviews,直到找到才停止遍历
  • subview必须符合
    • pointInside return YES
    • 属性限制有
      • alpha > 0.01
      • hidden == NO
      • userInteractionEnabled == YES
1
2
3
4
5
6
7
8
9
10
11
// 模拟原生未干预下的代码
override func hitTest(_ point: CGPoint, with event: UIEvent?) -> UIView? {
if !isUserInteractionEnabled || isHidden || alpha<=0.01 { return nil }
if !self.point(inside: point, with: event) { return nil }
for subview in subviews.reversed() {
let convertPoint = subview.convert(point, from: self)
let subHitTestView = subview.hitTest(convertPoint, with: event)
if let hitTestView = subHitTestView { return hitTestView }
}
return self
}

那我们干预后,HitTest的实战应用就有

  • 复杂的视图层级的拆分
1
2
3
4
override func hitTest(_ point: CGPoint, with event: UIEvent?) -> UIView? {
let view = super.hitTest(point, with: event)
return view == self ? nil : view
}
  • 自定义Touch事件传递对象
1
2
3
4
override func hitTest(_ point: CGPoint, with event: UIEvent?) -> UIView? {
let view = super.hitTest(point, with: event)
return view == someBtn ? anotherBtn : view
}
  • 自定义控件的响应区域及响应层级

view修改响应区域方式有两种,一种如下,它的superview来hitTest,第二种自己hitTest

1
2
3
4
5
6
override func hitTest(_ point: CGPoint, with event: UIEvent?) -> UIView? {
if someBtn.frame.insetBy(dx: -10, dy: -10).contains(point) {
return someBtn
}
return super.point(inside: point, with: event)
}

响应链 .nextResponder

和 hitTest自底向上相反,它是从最末端的responder向下传递,hitTest自下而上查找响应的view,nextResponder是基于hitTest基础上,自上而下寻找event的响应者

常见的应用案例:BPUIResponderAdditions中的方法,可以查找view的Controller或navigationController

1
2
3
4
5
6
7
8
9
10
11
12
13
14
15
- (nullable __kindof UIResponder *)findNextResonderInClass:(nonnull Class)responderClass
{
UIResponder *next = self;
do {
next = [next nextResponder];
if ([next isKindOfClass:responderClass]) {
break;
}
// next 不为空 且 不是达到最底层的 appdelegate
} while (next!=nil && ![next conformsToProtocol:@protocol(UIApplicationDelegate)]);
return next;
}
// 查询响应最近的 controller
UIViewController *vc = [view findNextResonderInClass:[UIViewController class]];

知识点:

  • 响应链事件传递

通过nextResponder向下传递event

演示

touchesBegan / super.touchesBegan 或 nextResponder.touchesBegan 一直调用下去

  • 第一响应者

    有拦腰截断的意思,原有的顶部第一响应者被修改,响应链中接收事件第一人(常见textField,webView及UImenuController,见demo)

演示

  • Button event 先下传递
  • becomeFirstResponder后,nextResponder无事件下传
  • canBecomeFirstResponder \ becomeFirstResponder 拦截
  • cancelsTouchesInView

系统会将Touch cancel消息发送给hitTestView ,并调用hitTestView的TouchCancel

演示

demo:button的touchUpInside对UIPanGestureRecognizer的影响

通用链接( Universal Links )

  • 通过唯一的网址, 就可以链接一个特定的视图到你的 APP 里面, 不需要特别的 schema
  • 不再需要JavaScript检查平台,跳转也不需要js去做特定处理
  • 比scheme更灵活更安全的匹配URL跳转
  • 实现App与Web一体化

注意:不能使用模拟器调试

image

工作原理:When the app is installed, the system downloads and verifies the site association file for each of its associated domains. If the verification is successful, the app is associated with the domain.

Configure your file server

要求如下:

Alright! So you have your signed apple-app-site-association file. Now you just need to configure your file server to host this for you. There are a few caveats:

  • It must be sent with the header ‘application/pkcs7-mime’
  • It must be sent from the endpoint youdomain.com/apple-app-site-association
  • It must return a 200 http code.

We set up the one for all Branch integrated apps using our Node+Express link servers. Here’s the code we used in case that’s helpful:

1
2
3
4
5
var aasa = fs.readFileSync(__dirname + '/static/apple-app-site-association');
app.get('/apple-app-site-association', function(req, res, next) {
res.set('Content-Type', 'application/pkcs7-mime');
res.status(200).send(aasa);
});

可以从原有的scheme过渡过来

1
2
3
4
5
6
7
8
9
10
11
12
13
14
15
- (BOOL)application:(UIApplication *)application openURL:(NSURL *)url sourceApplication:(NSString *)sourceApplication annotation:(id)annotation {
[self handleRouting:url];
return YES;
}
- (BOOL)application:(UIApplication *)application continueUserActivity:(NSUserActivity *)userActivity restorationHandler:(void (^)(NSArray *))restorationHandler {
if ([userActivity.activityType isEqualToString:NSUserActivityTypeBrowsingWeb]) {
[self handleRouting:userActivity.webpageURL];
}
return YES;
}
- (void)handleRouting:(NSURL *)url {
....
}

视频优先推荐
https://developer.apple.com/videos/play/wwdc2015/509/

优秀博客
https://blog.branch.io/how-to-setup-universal-links-to-deep-link-on-apple-ios-9

https://blog.branch.io/ios-9.2-deep-linking-guide-transitioning-to-universal-links

http://blog.hokolinks.com/how-to-implement-apple-universal-links-on-ios-9/

可能出现的bug(巨坑,也可能是配置问题)
http://stackoverflow.com/questions/32751225/ios9-universal-links-does-not-work

移动周分享-第60期

加速库在数学运算中的使用

除了加减乘除外还有好多好多数学运算需要我们处理,但我们很多都没有用到,感觉low爆了

Apple:加速框架文档

Any time you’ve got to make some numbers happen, it’s probably worth it to consider using Accelerate

示例

1
2
3
4
5
6
7
8
9
10
11
12
13
14
15
16
17
18
19
20
21
22
23
// 模拟随机数据
var doubles = (0...10000).map {_ in Double(arc4random()%10000)}
// 求和
// 常见的加法求和
let reduceSum = doubles.reduce(0) { $0+$1 }
// Accelerate 封装
let accSum = sum(doubles)
// 求最大值(最小值也一样)
let maxOfArr = max(doubles)
let maxOfArr2 = doubles.maxElement
// let maxOfArr2 = doubles.sort(>).first
// 平均值,哈哈大数据统计,可以测试准确率
let meanValue = mean(doubles)
let meanValue2 = doubles.reduce(0) { $0 + $1/Double(doubles.count) }
meanValue2
// 向量加减乘积
let vector1 = [2,4,5] as [Double]
let vector2 = [3,5,2] as [Double]
let sumArrs = add(vector1, y: vector2)

耗时上对比是不是reduce,map等系统的高阶函数被“加速库”秒了,但使用上貌似reduce,map是比较灵活的

1
2
let newReduceSum = (0...1000).reduce(0) { $0+$1 }
newReduceSum

其他计算的一点的应用

函数混合示例: 使用中文变量😄

1
2
3
4
5
6
7
8
9
10
11
12
13
14
15
16
17
18
19
20
21
22
23
24
25
26
27
28
29
30
31
32
33
let 函数点阵密度 = 64
let 频率1 = 4.0
let 相位1 = 0.0
let 幅度1 = 1.0
let 正弦函数1 = (0..<函数点阵密度).map {
幅度1 * sin(2.0 * M_PI / Double(函数点阵密度) * Double($0) * 频率1 + 相位1)
}
let 频率2 = 1.0
let 相位2 = M_PI / 2.0
let 幅度2 = 2.0
let 正弦函数2 = (0..<函数点阵密度).map {
幅度2 * sin(2.0 * M_PI / Double(函数点阵密度) * Double($0) * 频率2 + 相位2)
}
let 频率3 = 10.0
let 相位3 = M_PI / 3.0
let 幅度3 = 4.0
let 正弦函数3 = (0..<函数点阵密度).map {
幅度3 * sin(2.0 * M_PI / Double(函数点阵密度) * Double($0) * 频率3 + 相位3)
}
let 新函数1 = add(正弦函数1, y: 正弦函数2)
let 新函数2 = add(新函数1, y: 正弦函数3)
// Xcode 分栏查看图形排布,尤其是新函数的图形
新函数1.forEach { XCPlaygroundPage.currentPage.captureValue($0, withIdentifier:"新函数1") }
新函数2.forEach { XCPlaygroundPage.currentPage.captureValue($0, withIdentifier:"新函数2") }
正弦函数2.forEach { XCPlaygroundPage.currentPage.captureValue($0, withIdentifier:"正弦函数2") }
正弦函数1.forEach { XCPlaygroundPage.currentPage.captureValue($0, withIdentifier:"正弦函数1") }

傅里叶变换通俗篇讲解

1
2
3
// 查看图像发现‘新函数2’左右有三对波峰,得出它由三个正弦波组成(可对应得出振幅、频率及相位)
let 快速傅里叶转换 = fft(新函数2)
快速傅里叶转换.forEach { XCPlaygroundPage.currentPage.captureValue($0, withIdentifier:"快速傅里叶转换") }

矩阵计算

很多图像处理是根据矩阵做处理的,像素越大,处理性能要求越高

1
2
3
4
5
6
7
8
9
10
11
12
13
14
15
16
17
18
19
// 简单矩阵示例
// ⎛ 1 2 ⎞ ⎛ 3 2 ⎞ ⎛ 5 6 ⎞
// ⎢ ⎟ * ⎢ ⎟ = ⎢ ⎟
// ⎝ 3 -4 ⎠ ⎝ 1 2 ⎠ ⎝ 5 -2 ⎠
let A = Matrix([[1, 2], [3, -4]])
let B = Matrix([[3, 2], [1, 2]])
let C = A * B
// 利用逆矩阵求解
// ⎛ 1 1 ⎞ ⎛ 3 ⎞ ⎛ 2 ⎞
// ⎢ ⎟ * CC = ⎢ ⎟ CC = ⎢ ⎟
// ⎝ 1 -1 ⎠ ⎝ 1 ⎠ ⎝ 1 ⎠
let AA = Matrix([[1, 1], [1, -1]])
let BB = Matrix([[3], [1]])
let CC = inv(AA) * BB

应用的加速库函数

1
2
3
4
5
6
7
8
9
10
11
12
13
14
15
16
17
18
19
20
21
22
23
24
25
26
27
28
29
30
31
32
33
34
35
36
37
38
39
40
41
42
43
44
45
46
47
48
49
50
import Accelerate
public func sum(x: [Double]) -> Double {
var result: Double = 0.0
vDSP_sveD(x, 1, &result, vDSP_Length(x.count))
return result
}
public func max(x: [Double]) -> Double {
var result: Double = 0.0
vDSP_maxvD(x, 1, &result, vDSP_Length(x.count))
return result
}
public func mean(x: [Double]) -> Double {
var result: Double = 0.0
vDSP_meanvD(x, 1, &result, vDSP_Length(x.count))
return result
}
public func add(x: [Double], y: [Double]) -> [Double] {
var results = [Double](y)
cblas_daxpy(Int32(x.count), 1.0, x, 1, &results, 1)
return results
}
public func fft(input: [Double]) -> [Double] {
var real = [Double](input)
var imaginary = [Double](count: input.count, repeatedValue: 0.0)
var splitComplex = DSPDoubleSplitComplex(realp: &real, imagp: &imaginary)
let length = vDSP_Length(floor(log2(Float(input.count))))
let radix = FFTRadix(kFFTRadix2)
let weights = vDSP_create_fftsetupD(length, radix)
vDSP_fft_zipD(weights, &splitComplex, 1, length, FFTDirection(FFT_FORWARD))
var magnitudes = [Double](count: input.count, repeatedValue: 0.0)
vDSP_zvmagsD(&splitComplex, 1, &magnitudes, 1, vDSP_Length(input.count))
var normalizedMagnitudes = [Double](count: input.count, repeatedValue: 0.0)
vDSP_vsmulD(sqrt(magnitudes), 1, [2.0 / Double(input.count)], &normalizedMagnitudes, 1, vDSP_Length(input.count))
vDSP_destroy_fftsetupD(weights)
return normalizedMagnitudes
}

Xcode MarkDown的代码文档 ( for swift )

markdown在swift中的应用

goals

  • 描述各个属性、函数和类的真正用途
  • 高亮函数的输入和输出(参数和返回值)
  • 几个月后还能清晰地记得每个函数属性是为了什么
  • 使用工具制作具有专业外观的使用手册(比如:使用 Jazzy
  • Xcode 里写的代码文档能被预览

markdown grammar

1
2
3
4
5
6
7
8
9
10
11
12
13
14
15
16
17
18
19
20
21
22
23
#text#:文本标题
**text**:使文本具有加粗的效果
*text*:使文本具有斜体的效果
* text:使文本成为一个无序列表的元素,值得注意的是,有个 * 后面需要有一个空格。同样,可以使用 + 或 - 实现这个的功能
1.text:使文本成为一个有序列表的元素
[linked text](http://some-url.com):使文本成为可以点击的超链接
![image show](http://www.appcoda.com/wp-content/uploads/2016/05/t52_3_help_inspector1.png):可以显示图片
> text:创建一个块引用。
使用 4 个空格或 1 个 tab 来缩进所写的代码块,等价于 HTML 中的 \\ 标签。可以继续使用 4 个空格或 1 个 tab 来添加另一个缩进
如果不想使用空格或 tab 的话,可以使用 ` 。比如, `var myProperty` 会显示成 var myProperty
另一种创建代码块的方法是添加 4 个 `,并从下一行开始写具体的代码,最后添加 4 个 ` 表示结束
反斜杠修饰 Markdown 的特殊字符就可以避免 Markdown 语法的解析了。比如, \**this\** 就不会产生加粗的效果

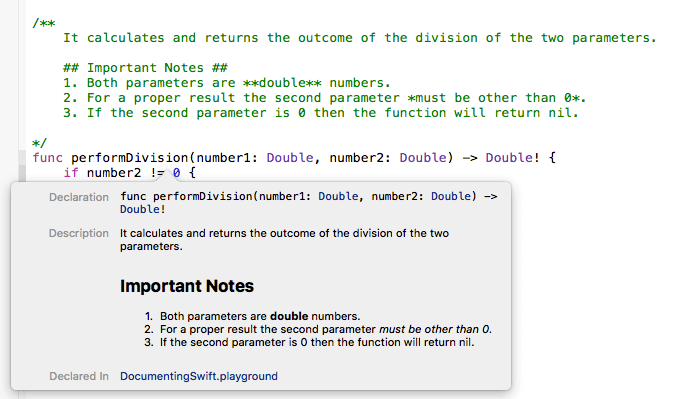
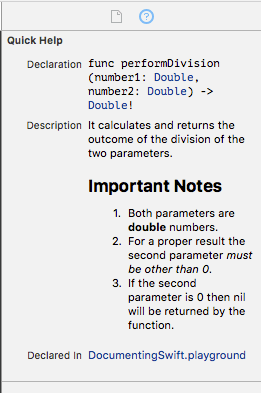
注释区域: 3 个斜线(///)或以下面的形式开头:

1
2
3
/**
*/
Case
1
2
3
4
5
6
7
8
9
10
11
12
13
14
15
16
17
/**
It calculates and returns the outcome of the division of the two parameters.
## Important Notes ##
1. Both parameters are **double** numbers.
2. For a proper result the second parameter *must be other than 0*.
3. If the second parameter is 0 then the function will return nil.
*/
func performDivisionnumber1: Double, number2: Double) -> Double! {
if number2 != 0 {
return number1 / number2
}
else {
return nil
}
}

case image

quick look

关键词

  • Parameter
  • Returns
  • Remark
  • SeeAlso
  • Precondiction
  • Requires
  • Todo
  • Version
  • Author
  • Note
1
2
3
4
5
6
7
8
9
10
11
12
13
14
15
16
17
18
19
20
21
22
23
24
25
26
27
28
/**
Another complicated function.
- Parameter fullname: The fullname that will be broken into its parts.
- Returns: A *tuple* with the first and last name.
- Remark:
There's a counterpart function that concatenates the first and last name into a full name.
- SeeAlso: `createFullName(_:lastname:)`
- Precondition: `fullname` should not be nil.
- Requires: Both first and last name should be parts of the full name, separated with a *space character*.
- Todo: Support middle name in the next version.
- Warning: A wonderful **crash** will be the result of a `nil` argument.
- Version: 1.1
- Author: Myself Only
- Note: Too much documentation for such a small function.
*/
func breakFullNamefullname: String) -> (firstname: String, lastname: String) {
let fullnameInPieces = fullname.componentsSeparatedByString(" "
return (fullnameInPieces[0], fullnameInPieces[1])
}

全关键字

Jazzy 自动产生代码文档

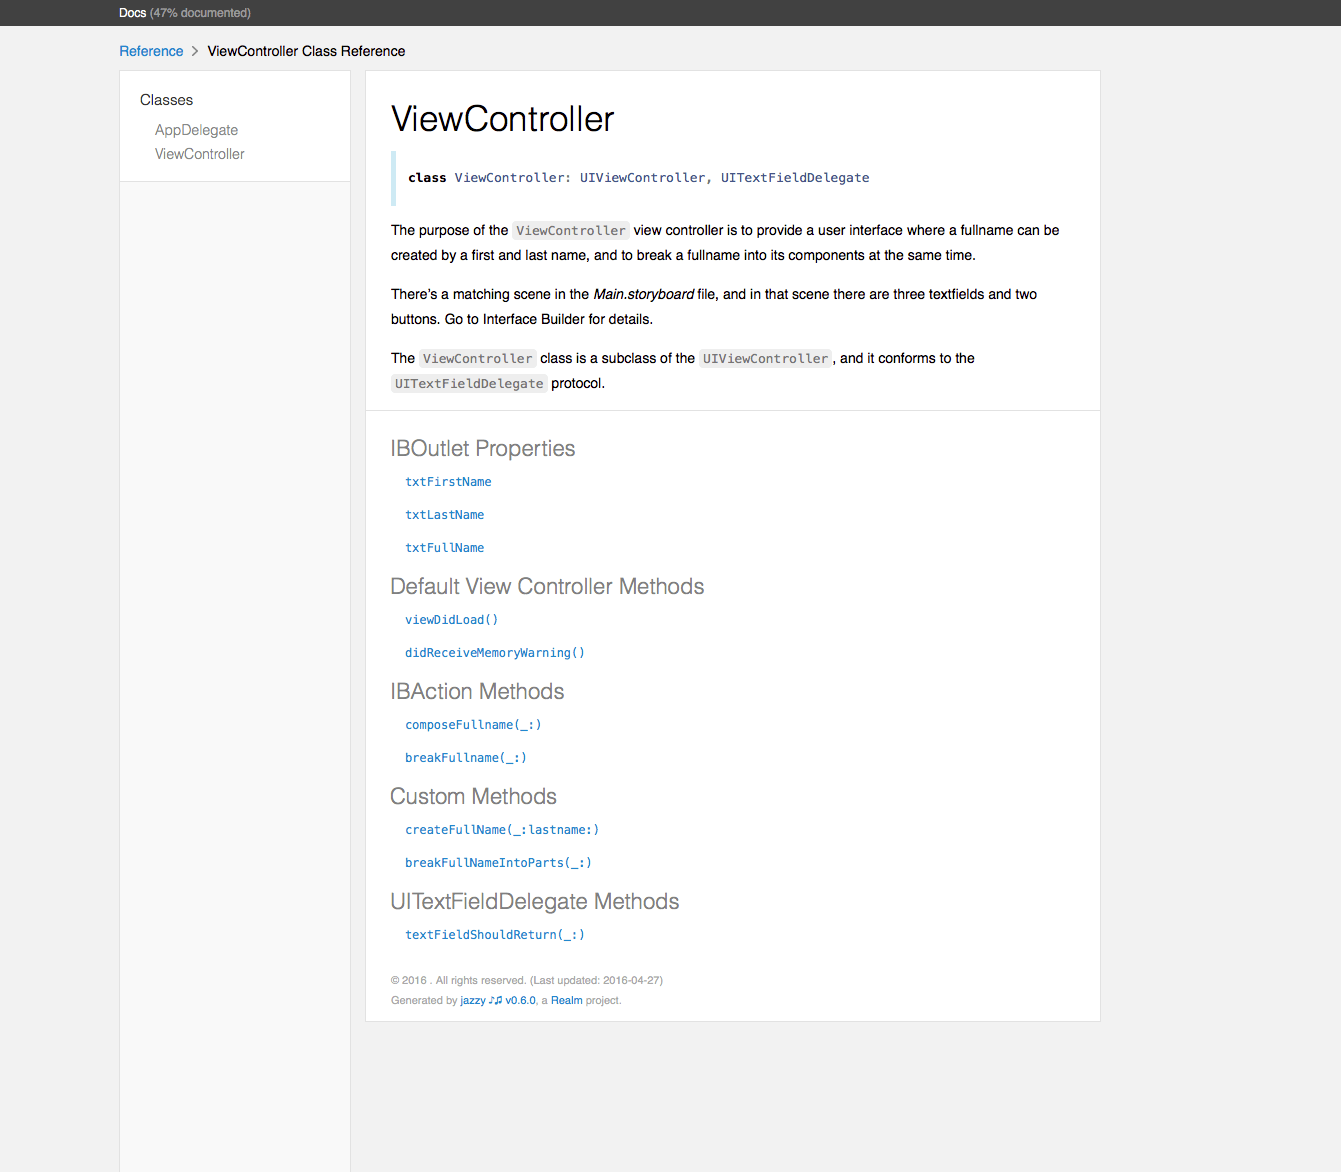
Jazzy 是一款可以为 Swift 和 Objective-C 代码产生具有 Apple 风格的代码文档工具。

效果如下

jazzy 效果

下面以Alamofire为例子:

jazzy –help 查看帮助

  • cd Alamofire 的项目path
  • jazzy –output /Users/xcodeyang/Desktop/jazzy_document

参考博客地址

枚举的特殊用法

枚举的特殊用法

源于项目中的应用太广了,但是对swift的很多简单特性不熟。之前那个动画的阶段使用到enum有遇到困难暂时绕开它了

当时的目标就是外部直接赋值操作

如下动画的enum示例:

为了省事,目前直接使用死的文案放在这里

1
2
3
4
5
6
7
8
9
10
11
12
13
14
15
16
17
18
19
20
21
22
23
24
25
26
27
28
29
30
31
32
33
34
enum AnimationPeriod: UInt {
// 动画执行的五个阶段
case Start,First,Second,Third,End
func description() -> String {
switch self {
case .Start, .First: return "正在提取学校最新\n录取条件"
case .Second: return "正在与学校进行匹配"
case .Third, .End: return "正在根据匹配结果\n生成选校方案"
}
}
func duration() -> NSTimeInterval {
switch self {
case .Start: return 0.8
case .First: return 1
case .Second: return 2
case .Third: return 0.5
case .End: return 0.25
}
}
}
extension AnimationPeriod {
mutating func next() {
switch self {
case .Start: self = .First
case .First: self = .Second
case .Second: self = .Third
case .Third: self = .End
default: self = .End
}
}
}

下面我们看看一些枚举的使用

携带参数

1
2
3
4
5
6
7
8
9
10
11
12
13
14
15
16
17
18
19
20
21
22
23
24
25
26
27
enum FamilyType {
case Father(age: Int)
case Mother(age: Int)
case Sister(age: Int)
func gift() -> String {
switch(self) {
case .Sister(let age):
if age > 15 {
return "iphone"
} else {
return "toy"
}
case .Mother(let age) where age < 40:
return "cloth"
default:
return "book"
}
}
}
let someone = FamilyType.Sister(age: 11)
let somebody = FamilyType.Mother(age: 40)
// swift的枚举技巧
let someoneGift = someone.gift() // print toy
let somebodyGift = somebody.gift() // book

####那我们要取值的有

  • 方法一
1
2
3
4
5
6
7
switch someone {
case .Father(let age):
age
case .Sister(let age):
age
default:()
}
  • 方法二
1
2
3
if case .Sister(let age) = someone {
age
}

枚举的嵌套

1
2
3
4
5
6
7
8
9
10
11
enum Colleague {
enum Weight: Int {
case Light
case Mid
case Heavy
}
case iOS(weight: Weight)
case Android(weight: Weight)
case HTML(weight: Weight)
}
let woodenHelmet = Colleague.iOS(weight: .Mid)

枚举的成员变量

之前就一直想要使用枚举做到外部动态对枚举赋值储存操作,
那成员变量用法如下

1
2
3
4
5
6
7
8
9
10
11
12
13
14
15
16
17
18
19
20
21
22
23
24
25
26
27
28
29
30
// 根据自身赋值
enum Device {
case iPad, iPhone
var year: Int {
switch self {
case iPhone: return 2007
case iPad: return 2010
}
}
}
// set get 方法对于枚举的成员变量是无效的,允许get调用但set不可执行
enum Book {
case Story, News
var year: Int {
set{
year = newValue
}
get{
return self.year
}
}
}
let myIpad = Device.iPad
myIpad.year
var storyBook = Book.Story
//storyBook.year = 2010 // set 方法此处报错
//storyBook.year // get 无效

初始化,感觉然并软

1
2
3
4
5
6
7
8
9
10
11
12
13
14
15
16
enum AppleDevice {
case iMac(price:Int)
case iPod(price:Int)
case iPhone(price:Int)
init (costMoney: Int) {
if costMoney > 10000 {
self = .iMac(price: costMoney)
} else if costMoney > 2500 {
self = .iPhone(price: costMoney)
} else {
self = .iPod(price: costMoney)
}
}
}
let myDevice = AppleDevice(costMoney: 6000)

元组的使用

多个参数的介入时,可以使用元组,此处常规使用报错暂时无法解决,
使用func函数赋值倒是没有出错。why??

1
2
3
4
5
6
7
8
9
10
11
12
13
14
15
16
17
18
enum HumanHabit {
case Reading
case PlayGame
case Traveling
}
typealias HumanInfo = (age: Int, name: String, habit: HumanHabit)
func selectRAM(humanInfo: HumanInfo) -> HumanInfo {return (age: 32, name: humanInfo.name, habit: humanInfo.habit)}
func selectCPU(humanInfo: HumanInfo) -> HumanInfo {return (age: humanInfo.age, name: "3.2GHZ", habit: humanInfo.habit)}
func selectGPU(humanInfo: HumanInfo) -> HumanInfo {return (age: humanInfo.age, name: "3.2GHZ", habit: .Reading)}
enum Desktop {
case Cube(HumanInfo)
case Tower(HumanInfo)
case Rack(HumanInfo)
}
let aTower = Desktop.Tower(selectGPU(selectCPU(selectRAM((0, "", .Traveling) as HumanInfo))))

Swift 的 Playground 学习

Swift 的 Playground 学习

我们一开始知道 Playground,也知道然后查看一些变量及变量的历史记录。偶尔还知道可以做视图甚至动画展示但是,现在,你特么看到的是 MarkDown 语法,有没有。

参考文献

使用优势

  • 快速学习swift
  • 快速测试代码效果
  • 验证API
  • 富文本注释

如下所有案例使用Xcode7下加载playground文件,可预览效果
文件下载链接

变量

至上而下执行,显示变量的当前值及历史记录的变化。

1
2
3
4
5
6
7
8
9
var name = "杨志"
name += "平"
// playground下预览
var graph = 0.0
for i in 0...100 {
graph = sin(Double(i)/10.0)
// playground下预览
}

UI视图

简单显示UI的基础元素

1
2
3
4
5
6
7
8
9
10
11
let redView = UIView(frame:CGRectMake(0,0,100,100))
redView.backgroundColor = UIColor.redColor()
redView.layer.cornerRadius = 20
redView.layer.borderWidth = 3
redView.layer.borderColor = UIColor.whiteColor().CGColor
let circle = UIView(frame:CGRectMake(25,25,50,50))
circle.backgroundColor = UIColor.yellowColor()
circle.layer.cornerRadius = 80
redView.addSubview(circle)
// playground下预览

重头戏

动画展示 & 网络请求

这里需要对 XCPlayground 有一点了解,好像还对SpriteKit做了支持文章连接

1
2
3
4
5
6
7
8
9
10
11
12
13
14
15
16
17
18
19
20
21
22
23
24
25
26
27
28
29
30
31
32
33
34
35
36
37
38
39
40
41
// 这个库需要import
import XCPlayground
let containerView = UIView(frame: CGRect(x: 0, y: 0, width: 320, height: 480))
containerView.backgroundColor = UIColor.yellowColor()
XCPlaygroundPage.currentPage.liveView = containerView
let view = UIView(frame: CGRect(x: 0, y: 0, width: 100, height: 100))
view.center = CGPoint(x: containerView.center.x, y: containerView.center.y-100)
view.backgroundColor = UIColor.redColor()
containerView.addSubview(view)
// playground下预览
UIView.animateWithDuration(3, delay: 0, usingSpringWithDamping: 0.1, initialSpringVelocity: 6, options: UIViewAnimationOptions.CurveEaseInOut, animations: {
view.center.y += 100
}, completion:{ (animation: Bool) in
view.center.y -= 100
}
)
// 异步操作:网络在家图片
// 旧接口:XCPSetExecutionShouldContinueIndefinitely(true)
XCPlaygroundPage.currentPage.needsIndefiniteExecution = true
let url = NSURL(string: "https://avatars1.githubusercontent.com/u/5317671?v=3&s=460")!
let task = NSURLSession.sharedSession().dataTaskWithURL(url) {
data, _, _ in
let image = UIImage(data: data!)
// playground下预览
}
task.resume()
// 快速检查API接口
let url2 = NSURL(string: "http://www.test.51offer.com/mobile/abroad/query_school_by_name?name=%E4%B8%80")!
let task2 = NSURLSession.sharedSession().dataTaskWithURL(url2) {
data, _, _ in
let str = String(NSString(data: data!, encoding: NSUTF8StringEncoding))
// playground下预览
}
task2.resume()

结构介绍

  • sources

    我们直接在 Playground 上面写代码,然后编译器会实时编译我们代码,并将结果显示出来。但是效率很低,source的作用就可以发挥出来

  • resources

    可以作为sandbox使用

1
2
3
4
5
6
7
8
9
10
11
12
13
14
// 直接使用PicButton 这个class.
// 注意点:PicButton的类及初始化方法必须是public的
let btn = PicButton(frame: CGRectMake(0,0,200,100))
// playground下预览
// 如上述:在resources中放入jpg图片,加载本地资源
if let path = NSBundle.mainBundle().pathForResource("swift-playground", ofType: "jpg") {
let image = UIImage(contentsOfFile:path)
let imageView = UIImageView(image: image)
// playground下预览
}

快速集成TouchID

快速集成TouchID

iPhone 5s,iOS 8,iOS7时未开放

依赖 LocalAuthentication.framework

1
2
3
4
5
6
7
8
9
10
11
12
13
14
15
16
// 判断设备支持状态
LAContext *context = [[LAContext alloc] init];
[context canEvaluatePolicy:LAPolicyDeviceOwnerAuthenticationWithBiometrics error:nil];
// 如果可以
[context evaluatePolicy:LAPolicyDeviceOwnerAuthenticationWithBiometrics localizedReason:@"reason" reply:^(BOOL success, NSError *error) {
if (success) {
//验证成功,主线程处理UI
}
else
{
// 重点:错误处理,分为多种错误
// 有验证失败、取消、手动输入密码等等相对应的逻辑处理
// 详见demo
}
}];

错误类型

  • LAErrorAuthenticationFailed
  • LAErrorUserCancel
  • LAErrorUserFallback
  • LAErrorSystemCancel
  • LAErrorPasscodeNotSet
  • LAErrorTouchIDNotAvailable
  • LAErrorTouchIDNotEnrolled
  • LAErrorTouchIDLockout NS_ENUM_AVAILABLE(10_11, 9_0)
  • LAErrorAppCancel NS_ENUM_AVAILABLE(10_11, 9_0)
  • LAErrorInvalidContext NS_ENUM_AVAILABLE(10_11, 9_0)

高阶函数及参数的省略

常见定义函数

1
2
3
4
5
6
let normalFunc = {
() -> Int in
return 10086
}
let normalResult = normalFunc()
// normalResult = 10086

###函数参数的『省略』

1
2
3
4
5
6
7
8
9
10
11
12
13
14
15
16
17
18
19
20
21
22
23
24
25
26
27
28
29
30
// 以数组排序函数为例:
var numberArr = [1,7,4,6,3,2,5]
let res1 = numberArr.sort()
let res2 = numberArr.sort {
(num1: Int, num2: Int) -> Bool in
return num1>num2
}
let res3 = numberArr.sort {
(num1: Int, num2: Int) in
return num1>num2
}
let res4 = numberArr.sort {
(num1, num2) in
return num1>num2
}
let res5 = numberArr.sort {
return $0 > $1
}
let res6 = numberArr.sort {
$0 > $1
}
let res7 = numberArr.sort(>)

变化过程
{ (num1: Int, num2: Int) -> Bool in return num1>num2 }
{ (num1: Int, num2: Int) in return num1>num2 }
{ (num1, num2) in return num1>num2 }
{ return $0 > $1 }
{ $0 > $1 }

函数式编程

案例一

1
2
3
4
5
6
7
8
9
10
11
12
13
14
15
16
17
18
19
20
21
22
23
24
25
26
27
28
29
30
31
32
func square(a:Float) -> Float {
return a * a
}
func cube(a:Float) -> Float {
return a * a * a
}
func averageSumOfSquares(a:Float,b:Float) -> Float {
return (square(a) + square(b)) / 2.0
}
func averageSumOfCubes(a:Float,b:Float) -> Float {
return (cube(a) + cube(b)) / 2.0
}
// 像Swift的Currying(柯里化),可以灵活调配使用
func averageOfFunction(a a:Float,b:Float,f:(Float -> Float)) -> Float {
return (f(a) + f(b)) / 2
}
let squareResult1 = averageOfFunction(a: 2, b: 4, f: square)
let squareResult2 = averageOfFunction(a: 2, b: 4, f: {
(a: Float) -> Float in
return a * a
})
//{(x: Float) -> Float in return x * x}
//{x in return x * x}
//{x in x * x}
//{$0 * $0}
let squareResult3 = averageOfFunction(a: 2, b: 4, f: {$0 * $0})

案例二

1
2
3
4
5
6
7
8
9
10
11
12
13
14
15
16
17
18
19
20
21
22
23
24
25
26
27
28
29
30
31
32
33
34
// 正统高阶函数样式
func sum1(value: Int) -> (Int -> Int) {
func adder(otherValue: Int) -> Int {
return otherValue + value
}
return adder
}
// 省略后
func sum2(value: Int) -> (Int -> Int) {
return { $0 + value }
}
let result1 = sum1(2)(3)
let result2 = sum2(5)(3)
// 改造函数完毕
func funcMathMethod1(first: Int -> Int, _/*起到变量匿名作用*/ second: Int -> Int) -> Int -> Int {
return { second(first($0)) }
}
let f1 = funcMathMethod1({$0 + 2}, {$0 / 3})
f1(7)
let f2 = funcMathMethod1({$0 * $0}, {$0 / 4})
f2(10)
// Tip: 使用函数式编程,要是用得不好容易造成可读性很差,那优化如下
typealias MathFunc = Int -> Int
func funcMathMethod2(f: MathFunc, _ s: MathFunc) -> MathFunc {
return { s(f($0)) }
}
let readability = funcMathMethod1({$0 + 2}, {$0 / 3})
readability(7)

swift原生常用的高阶函数

1
2
3
4
5
6
7
8
9
10
11
12
13
14
15
16
17
18
19
20
21
22
23
24
25
26
27
28
29
30
31
32
33
34
35
36
37
38
// map
var numberArr = [1,7,4,6,3,2,5]
let mapArray = numberArr.map { (num: Int) -> String in
return "第\(num)名"
}
let mapArray2 = numberArr.map({"第\($0)名"})
mapArray2
// 可选型随意解包 str 可以为 nil
let str: String? = "1234567890"
let mapStr = str.map({"第\($0)名"})
mapStr
// filter
let filArr = numberArr.filter { (num: Int) -> Bool in
return num > 4
}
let filArr2 = numberArr.filter({ $0 > 4 })
filArr2
// reduce
let sum = numberArr.reduce(0) { (presum:Int, num:Int) -> Int in
return presum + num
}
let sum2 = numberArr.reduce(10, combine: {$0 + $1})
sum2
let sumToStr = numberArr.reduce("") { (str: String, num: Int) -> String in
str + String(num)
}
// 求一个数组中偶数的平方和(一口气使用swift提供的三个高阶函数)
//[1,2,3,4,5,6,7] -> [2,4,6] -> 4+16+36 = 56
let result = numberArr.filter({$0%2==0}).map({$0*$0}).reduce(0, combine: {$0+$1})
result // result = 56

面试题1

1
2
3
4
5
6
7
8
9
10
11
12
13
// 面试题:用数组的 reduce 方法实现 map 的功能。
let arr = [1, 3, 2]
// map简易实现
let res = arr.map({$0*2})
// Array.reduce(<#T##initial: T##T#>, combine: <#T##(T, Int) throws -> T#>)
// 输出数据类型与初始化占位数据类型(initial)一致
let res2 = arr.reduce([]) {
(a: [Int], element: Int) -> [Int] in
var t = Array(a)
t.append(element * 2)
return t
}

面试题1

1
2
3
4
5
6
7
8
9
10
11
12
13
// 面试题:用 reduce 方法一次求出数组中奇数的和、以及偶数乘积
// 使用元组,注意占位数据(0, 1),第一联合数据a :(Int, Int),函数输出数据(Int, Int) 三者类型一致
let arr2 = [1, 3, 2, 4]
let res3: (Int, Int) = arr2.reduce((0, 1)) {
(a :(Int, Int), element: Int) -> (Int, Int) in
if element % 2 == 0 {
return (a.0, a.1 * element)
} else {
return (a.0 + element, a.1)
}
}

swift 的 guard & defer

guard 使用

守卫,和隐式解析搭配有奇效

1
2
3
4
5
6
7
8
9
10
11
12
13
14
15
16
17
18
19
20
21
22
23
24
25
26
27
28
29
30
31
32
33
34
35
36
37
38
39
40
41
42
43
44
45
46
47
// 原始方法 (强解包可能会出现问题)
func tranIntToString1(x: Int?) -> String {
if x == nil || x! <= 0 {
// 不符合值的要求时,写点代码
return ""
}
// 使用x
return x!.description
}
// 改进
func tranIntToString2(x: Int?) -> String {
if let x = x where x>0 {
return x.description
}
return ""
}
// 保镖模式
// 和上面写法对比
func tranIntToString3(x: Int?) -> String {
guard let x = x where x > 0 else {
return ""
}
// 变量不符合条件判断时,执行下面代码
return x.description
}
// 非可选型
func tranIntToString4(x: Int) -> String {
guard x > 0 else {
return ""
}
return x.description
}
// 常常用于条件判断拦截
var view = UIView(frame: CGRectMake(0,0,80,80))
view.backgroundColor = UIColor.redColor()
UIView.animateWithDuration(0.3) { [weak view]() -> Void in
guard let view = view where view.alpha>0 else {return}
view.alpha = 0
}

懒加载

1
2
3
4
5
6
7
8
9
10
11
12
13
14
15
16
17
18
//1.分析 NSArray 是一个闭包的返回值,而这是一个没有参数的闭包
lazy var dataArray:NSArray = { [] }()
//2.也可以写成这样
lazy var dataArray:NSArray = { return NSArray() }()
//3.从plist文件加载
lazy var dataArray:Array<XWWine> = {
let winePath = NSBundle.mainBundle().pathForResource("wine.plist", ofType: nil)!
let winesM = NSMutableArray(contentsOfFile: winePath);
var tmpArray:Array<XWWine>! = []
for tmpWineDict in winesM! {
var wine:XWWine = XWWine.wineWithDict(tmpWineDict as! NSDictionary)
tmpArray.append(wine)
}
//lazy闭包里就运行一次
return tmpArray
}()

调用的时候再在家初始化方法(懒加载)

1
2
3
4
lazy private var underlineView: UIView = {
let view = UIView(frame: .zero)
return view
}()

defer 关键字

1
2
3
4
5
6
7
8
9
10
11
12
13
14
15
16
17
18
19
20
21
22
23
24
25
26
27
28
29
30
31
32
33
34
/*
defer 关键字
*/
postfix func ++(inout x: Int) -> Int {
defer {
x = x/2
defer {
x += 100
}
}
return x
}
//
//postfix func ++(inout x: Int) -> Int {
// let current = x
// x += 2
// return current
//}
var num = 100
let num2 = num++
num //150
num2 //100
prefix func ++(inout x:Int) -> Int {
x += 2
return x
}
var number = 100
let number2 = ++number
number // 102
number2 // 102

嵌套枚举使用(简直就是动态Model)

1
2
3
4
5
6
7
8
9
10
11
12
13
14
15
16
17
18
19
20
21
22
23
24
25
26
public enum MenuScrollingMode {
case ScrollEnabled
case ScrollEnabledAndBouces
case PagingEnabled
}
public enum MenuItemWidthMode {
case Flexible
case Fixed(width: CGFloat)
}
public enum MenuDisplayMode {
case Standard(widthMode: MenuItemWidthMode, centerItem: Bool, scrollingMode: MenuScrollingMode)
case SegmentedControl
case Infinite(widthMode: MenuItemWidthMode)
}
// 初始化:用来携带信息很不错
public var menuDisplayMode = MenuDisplayMode.Standard(widthMode: PagingMenuOptions.MenuItemWidthMode.Fixed(width: 44), centerItem: false, scrollingMode: PagingMenuOptions.MenuScrollingMode.PagingEnabled)
// 实例
func labelWidth(size size: CGSize, widthMode: PagingMenuOptions.MenuItemWidthMode) -> CGFloat {
switch widthMode {
case .Flexible: return ceil(size.width)
case let .Fixed(width): return width
}
}